Ed. Note: We’re trying something new. I mentioned that PMB! is getting a major overhaul soon. (Don’t worry, you didn’t miss it. You’ll KNOW.) One of the planned changes is that we’ll be hosting features and articles by guest contributors. Our first article on lowering the 1:18 Hot Wheels Batmobile, by Insane Detailing’s Doug Switz was such a hit, that we want to share more info from our esteemed colleagues in the Batmobile community. Here then, is Kevin White of Bats Inc. with a review of the Polar Lights [Round 2] 1966 Batmobile Snap-Kit packaging.
I received my snap kit today, a gift from a friend back home. Not much has been said yet about the packaging of the kit. I will leave the building review to Scooter as he is already well on his way with that, but I thought it might be interesting to let you all know what to expect upon receiving your model.

1. The window box itself is quite nice, featuring the Alex Ross artwork on four sides and photos of the painted and assembled kit on the back along with small advertisement of the other related Bat kits. On the base of the box is a picture of the slot racing set and of course the UPC. A very attractive box, pretty much suitable for display itself.
2. The paper materials inside include the instruction sheet which, while well done and concise seems a little crowded in some spots. The decal sheet is quite decent. Packaged in it’s own baggie it includes duplicates of some of the more important decals like two sets of speedometer decal for the steering wheel. Kudos to Polar Lights for that! Finally there is the requisite survey/newsletter sign up card and a miniature version of their catalog.
3. The body in my example has some fingerprints and oily residue that both wipe off easily. Even with a few specks of dust in the paint it’s still hard not to marvel (sorry D.C.) at the shine of the paint. My body has a slight flaw in the driver’s side wing top in that it isn’t seated all the way down. A few seconds with some liquid cement, applied from the underside and a little pressure should easily resolve this.

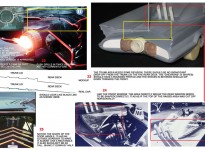
4. The chrome tree is a truncated version of what we’ll see in the glue kit. Again, packaged in it’s own baggie there is a tree for the wheels separated from the beacon and rocket tubes by tissue paper to protect them from rubbing each other and wearing through the chrome during shipping and handling. Also in this baggie are the wheel spinners, pre-painted with red and the white outline my example had two perfect spinners and two that for some reason were slightly bent.
5. The next package contains the body skirts, tires and axles with chassis mounting screws. Although one baggie, the metal parts are heat sealed and separated from the tires as are the tires from the skirts. This is to keep the tires or axles from getting against the body skirts and leaving marks. Again, kudos to PL.
6. The bulk of the interior parts and the afterburner (season one) are contained in the next baggie along with those curious J shaped floor boards which are necessary for mounting the dash section.


7. The rest of the interior parts as well as the grilles and parachutes are packaged together in the next baggie and another baggie contains the chassis pan with it’s turbine engine molded in.

8. Last but by no means least comes the clear tree. This contains the canopies, beacon lens, headlight covers and front and rear lights. More tissue is employed here to separate the forward and rear canopies so they don’t rub each other and scratch. Double kudos for that!
While I feel Polar lights could have a better job on the pre-paint – what they did do is nice and goes a long way towards helping the novice builder in assembling a really good looking model. The kit does have some issues like parts that fit too tightly or too loosely. The spinners, rocket tubes, steering wheel, bat-phone and bat-beam all fit too tight and care should be taken to prevent breakage. Most of these items attach with a half-moon style pin and the pin should be sanded down slightly with an emery board rather than try to rout out a half moon mounting hole. As for the rocket tubes, if you don’t want the chrome scraped off, rout the holes in the deck before test fitting. The bat-phone cord does not stay in place and needs a touch of glue.
All in all it’s a very fine kit and should be an enjoyable diversion for the experienced and the uninitiated alike.
“To the Batmobile…let’s go!”
– Kevin White, Bats Inc.


Kevin
July 16, 2011 at 11:36 pmAs a side note: Watch the decals sheet closely as some of the decals are mismarked on the instructions. The center decal for the steering wheel is marked as the center for the compass.
Kevin
July 19, 2011 at 2:12 pmHere’s a mod i’m particularly proud of…
[IMG]http://i712.photobucket.com/albums/ww123/Futurabat6543/IMG_1245.jpg[/IMG]
[IMG]http://i712.photobucket.com/albums/ww123/Futurabat6543/IMG_1244.jpg[/IMG]
Kevin
July 19, 2011 at 2:13 pmOkay that didn’t work particularly well.:(